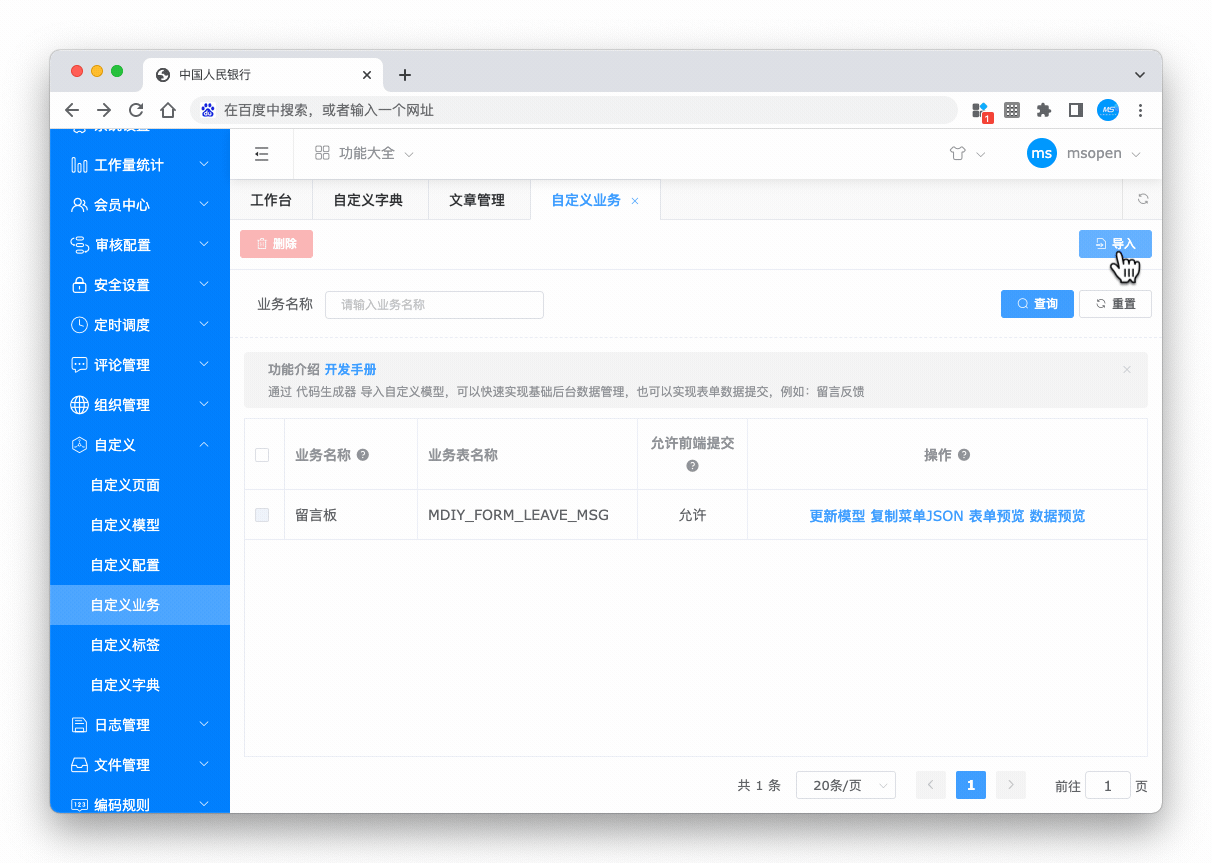
自定义业务
零代码实现一张表的增、删、改、查业务。
通过 代码生成器 导入自定义业务,可以快速实现基础后台数据管理,也可以实现表单数据提交,
通过代码生成器设计好配置表单
导入模型后直接后台就可以录入数据,可以实现日常简单的数据收集工作。
Tip
可以设置为前台游客模式提交数据,就可以实现留言反馈、报名收集等一些基本的信息收集
零代码创建一个业务数据管理
-
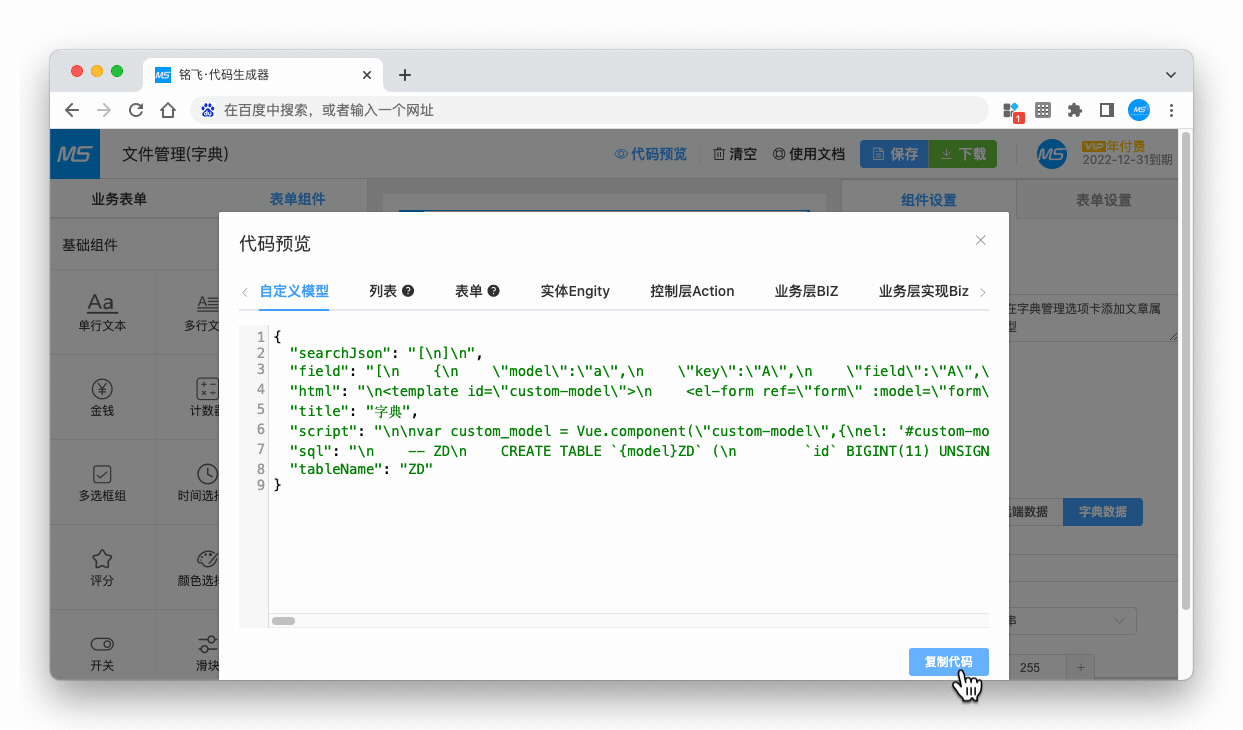
使用平台 代码生成器 可视化设计出一个 业务表单
-
点击代码预览>自定义模型 复制自定义模型json代码
-
自定义业务导入自定义模型json代码,导入成功后就可以进行增、删、改、查
Tip
通过
复制菜单JSON在权限管理菜单管理导入到一个已有到菜单中,通过这种方式可以快速实现基本数据管理业务系统
前端使用业务表单,如:在线留言
主要有两种实现方式,动态渲染是基于 element-plus;如果在前台模板使用,必须允许前端提交
方式一、动态渲染表单
通过提供的js库,可以动态渲染表单,实现表单数据提交。
Vue3使用方法(推荐)
<!-- 注意这里省略了基础库的引入,具体参考本文档的 [插件使用手册] 章节 -->
<script>
    ms.base = "{ms:global.contextpath/}";
    ms.manager = ms.base;
    ms.contextpath = ms.base;
</script>

<div id="form" v-cloak>
    <!-- 前台模板使用 model-name-->
    <!-- 后台使用 model-id-->
    <ms-mdiy-form style="height: auto; !important;" ref="modelForm" type="form" model-name="业务名称"></ms-mdiy-form>
    <!--必须包含验证码-->
    <el-form ref="form" :model="form" :rules="rules" label-position="right" size="large" label-width="120px">
        <el-row :gutter="0" justify="start" align="top">
            <el-col :span="12">
                <el-form-item label="验证码" prop="rand_code">
                    <el-input
                            v-model="form.rand_code"
                            :disabled="false"
                            :readonly="false"
                            :clearable="true"
                            placeholder="请输入验证码">
                    </el-input>
                </el-form-item>
            </el-col>
            <el-col :span="12">
                <div style="display: flex; height: 38px;margin-left: 1em; align-items: center; cursor: pointer">
                    <img :src="verifCode" class="code-img" @click="code"/>
                    <div @click="code" style="margin-left: 10px">
                        看不清?换一张
                    </div>
                </div>
            </el-col>
        </el-row>
        <el-form-item label="">
            <el-button @click="save" type="primary" :loading="isLoading" style="width: 200px">
                {{isLoading ? '保存中' : '保存'}}
            </el-button>
        </el-form-item>
    </el-form>
</div>

<script>
    var form = new _Vue({
        el: '#form',
        data: function(){
            return{
                verifCode: ms.base + "/code?t=" + new Date().getTime(),
                isLoading: false,
                form: {
                    rand_code: ''
                },
                rules: {
                    rand_code: [
                        {required: true, message: '请输入验证码', trigger: 'blur'},
                        {min: 1, max: 4, message: '长度不能超过4个字符', trigger: 'change'}
                    ],
                },
            }
        },
        methods: {
            save: function () {
                var that = this;
                that.isLoading = true;

                var formModel = that.$refs.modelForm.getForm();
                //将验证码值复制到自定义模型
                formModel.form.rand_code = this.form.rand_code;

                //验证表单是否完整
                that.$refs.form.validate(function (valid) {
                    if (valid) {
                        //调用自定义模型的保存
                        formModel.save(function (res) {
                            if (res.result) {
                                that.$notify({
                                    title: '成功',
                                    type: 'success',
                                    message: '提交成功!'
                                });
                                // 清空表单
                                formModel.form = {};
                                that.$refs.form.resetFields();
                            } else {
                                that.$notify({
                                    title: '失败',
                                    message: res.msg,
                                    type: 'warning'
                                });
                            }
                            that.isLoading = false;
                            that.code();
                        });
                    }
                });
            },
            code: function () {
                this.verifCode = ms.base + "/code?t=" + (new Date).getTime();
            }
        },
        created: function () {}
    });
</script>
Vue2使用方法(废弃)
<!-- 注意这里省略了基础库的引入,具体参考本文档的 [插件使用手册] 章节 -->
<!-- 引入自定义库 -->
<script src="/static/mdiy/index.js"></script>

<div id="form" v-cloak>
    <div id="formModel">
     <!--会自动渲染代码生成器的表单-->
    </div>

    <!--必须包含验证码-->
    <el-form ref="form" :model="form" :rules="rules" label-position="right" size="large" label-width="120px">
        <el-row  :gutter="0" justify="start" align="top">
            <el-col :span="12">
                <el-form-item label="验证码" prop="rand_code">
                    <el-input
                            v-model="form.rand_code"
                            :disabled="false"
                            :readonly="false"
                            :clearable="true"
                            placeholder="请输入验证码">
                    </el-input>
                </el-form-item>
            </el-col>
            <el-col :span="12">
                <div style="display: flex; height: 38px;justify-content: center; align-items: center; cursor: pointer">
                    <img :src="verifCode" class="code-img" @click="code"/>
                    <div @click="code" style="margin-left: 10px">
                        看不清?换一张
                    </div>
                </div>
            </el-col>
        </el-row>
        <el-form-item label="  ">
            <el-button @click="save" type="primary" :loading="isLoading" style="width: 200px">
                {{isLoading?'保存中':'保存'}}
            </el-button>
        </el-form-item>
    </el-form>
</div>

<script>
    var form = new Vue({
        el: '#form',
        data: {
                formModel: undefined, //自定义业务的vue对象
                verifCode:  "/code?t=" + new Date().getTime(),
                isLoading: false,
                form: {
                    rand_code:''
                },
                rules: {
                    rand_code: [
                        {required: true, message: '请输入验证码', trigger: 'blur'},
                        {min: 1, max: 4, message: '长度不能超过4个字符', trigger: 'change'}
                    ],
                },
        },
        methods: {
            save: function() {
                var that = this;
                that.isLoading = true;
                //将验证码值复制到自定义模型
                window.formModel.form.rand_code = this.form.rand_code;
                //调用自定义模型的保存
                window.formModel.save(function(res) {
                    if (res.result) {
                        that.$notify({
                            title: '成功',
                            type: 'success',
                            message: '保存成功!'
                        });
                        window.formModel.form = {}
                        that.form.rand_code = "";
                        that.$refs.form.resetFields(); //清空表单
                    } else {
                        that.$notify({
                            title: '失败',
                            message: res.msg,
                            type: 'warning'
                        });
                    }
                    that.isLoading = false;
                    that.code();
                });
            },
            code: function () {
                this.verifCode = ms.base + "/code?t=" + (new Date).getTime();
            }
        },
        created: function() {
            window.formVue = this;
            this.$nextTick(function () {
                ms.mdiy.model.form("formModel", { "modelName": "留言板" }).then(function(obj) {
                    window.formModel = obj;
                    window.formModel.form.modelName = obj.modelName;
                });
            });
        }
    });
</script>
Tip
modelName(业务名称)必须与代码生成器上必须名称一致。
- 特殊用法,一个页面有多个自定义业务表单(仅5.5.0及以上版本支持)
// 在第一个模型下面增加以下代码就可以实现一个页面渲染多个自定义业务表单
// 注意id不能相同
<div id="testForm" v-cloak>
    <div id="testModelForm">
        <!--会自动渲染代码生成器的表单-->
    </div>

    <!--必须包含验证码-->
    <el-form ref="form" :model="form" :rules="rules" label-position="right" size="large" label-width="120px">
        <el-row :gutter="0" justify="start" align="top">
            <el-col :span="12">
                <el-form-item label="验证码" prop="rand_code">
                    <el-input
                            v-model="form.rand_code"
                            :disabled="false"
                            :readonly="false"
                            :clearable="true"
                            placeholder="请输入验证码">
                    </el-input>
                </el-form-item>
            </el-col>
            <el-col :span="12">
                <div style="display: flex; height: 38px;justify-content: center; align-items: center; cursor: pointer">
                    <img :src="verifCode" class="code-img" @click="code"/>
                    <div @click="code" style="margin-left: 10px">
                        看不清?换一张
                    </div>
                </div>
            </el-col>
        </el-row>
        <el-form-item label="  ">
            <el-button @click="save" type="primary" :loading="isLoading" style="width: 200px">
                {{isLoading?'保存中':'保存'}}
            </el-button>
        </el-form-item>
    </el-form>
</div>
<script>
    //vue的实例名称必须为 form
    var test = new Vue({
        el: '#testForm',
        data: {
            testModelForm: undefined, //自定义业务的vue对象
            verifCode:  "/code?t=" + new Date().getTime(),
            isLoading: false,
            form: {
                rand_code:''
            },
            rules: {
                rand_code: [
                    {required: true, message: '请输入验证码', trigger: 'blur'},
                    {min: 1, max: 4, message: '长度不能超过4个字符', trigger: 'change'}
                ],
            },
        },
        methods: {
            save: function() {
                var that = this;
                that.isLoading = true;
                //将验证码值复制到自定义模型
                // 改成自定义业务的vue对象
                window.testModelForm.form.rand_code = this.form.rand_code;
                //调用自定义模型的保存
                window.testModelForm.save(function(res) {
                    if (res.result) {
                        that.$notify({
                            title: '成功',
                            type: 'success',
                            message: '保存成功!'
                        });
                        window.formModel.form = {}
                        that.form.rand_code = "";
                        that.$refs.form.resetFields(); //清空表单
                    } else {
                        that.$notify({
                            title: '失败',
                            message: res.msg,
                            type: 'warning'
                        });
                    }
                    that.isLoading = false;
                    that.code();
                });
            },
            code: function () {
                this.verifCode = ms.base + "/code?t=" + (new Date).getTime();
            }
        },
        created: function() {
            this.$nextTick(function () {
                // 挂载的dom节点需要区分
                ms.mdiy.model.form("testModelForm", { "modelName": "测试模型" }).then(function(obj) {
                    window.testModelForm = obj;
                    window.testModelForm.form.modelName = obj.modelName;
                });
            });
        }
    });
</script>
方式二、对接表单
不用动态渲染表单,根据自己的风格编写表单效果,但是每个表单项的属性必须与代码生成器生成的表单属性一致。
<!-- 注意这里省略了基础库的引入,具体参考本文档的 [插件使用手册] 章节 -->
<!-- 引入自定义库 -->
<script>
    ms.base = "{ms:global.contextpath/}";
    ms.manager = ms.base;
    ms.contextpath = ms.base;
</script>

<div id="form">
    <el-form ref="form" :model="form" :rules="rules" label-position="right" size="large">
        <el-form-item  label="名字" prop="username">
            <el-input
                    v-model="form.username"
                    :disabled="false"
                    :readonly="false"
                    :style="{width:  '100%'}"
                    :clearable="true"
                    placeholder="请输入名字">
            </el-input>
        </el-form-item>
        <el-form-item  label="邮箱" prop="email">
            <el-input
                    v-model="form.email"
                    :disabled="false"
                    :readonly="false"
                    :style="{width:  '100%'}"
                    :clearable="true"
                    placeholder="请输入邮箱">
            </el-input>
        </el-form-item>
        <el-form-item  label="留言" prop="content">
            <el-input
                    type="textarea" :rows="5"
                    :disabled="false"
                    v-model="form.content"
                    :style="{width: '100%'}"
                    placeholder="请输入留言">
            </el-input>
        </el-form-item>
        <el-form-item label="验证码" prop="rand_code">
            <el-row>
                <el-col :span="10">
                    <el-input v-model="form.rand_code"
                              :disabled="false" :readonly="false" :clearable="true"
                              placeholder="请输入验证码">
                    </el-input>
                </el-col>
                <el-col :span="6">
                    <img height="40px" :src="verifCode" @click="code" style="margin-left: 10px"/>
                </el-col>
            </el-row>
        </el-form-item>
        <el-form-item label="  ">
            <el-button @click="save" type="primary" :loading="isLoading" style="width: 200px">
                {{isLoading?'提交留言中':'提交留言'}}
            </el-button>
        </el-form-item>
    </el-form>
</div>

<script>
    var form = new Vue({
        el: '#form',
        data: function () {
            return {
                verifCode: "/code.do?" + new Date().getTime(),
                isLoading: false,
                form: {
                    // modelName 与 modelId 任选其一即可
                    modelName: "留言板", //modelName需要填写自己的模型昵称
                    modelId: "模型id",  //modelId需要填写自己的模型id
                    // 表单项字段名称使用驼峰命名写法
                    // 名字
                    username:'',
                    // 邮箱
                    email:'',
                    // 留言
                    content:'',
                    // 验证码
                    rand_code:'' // 固定的字段名称
                },
                rules:{
                    // 名字
                    username: [{"required":true,"message":"名字不能为空"},{"min":0,"max":255,"message":"名字长度必须为0-255"}],
                    // 邮箱
                    email: [{"required":true,"message":"邮箱不能为空"},{"pattern":/^\w+((-\w+)|(\.\w+))*@[A-Za-z0-9]+((\.|-)[A-Za-z0-9]+)*\.[A-Za-z0-9]+$/,"message":"邮箱格式不匹配"},{"min":0,"max":255,"message":"邮箱长度必须为0-255"}],
                    // 留言
                    content: [{"required":true,"message":"留言不能为空"}],
                    // 验证码
                    rand_code: [{"required":true,"message":"验证码不能为空"}],
                },
            }
        },
        methods: {
            code: function () {
                this.verifCode = "/code.do?" + new Date().getTime();
            },
            save: function (e) {
                e.preventDefault();//阻止默认事件跳转
                var that = this;
                that.$refs.form.validate(function (valid) {
                    if (valid) {
                        // 通过模型渲染的表单 则放开下面的注释(3行)
                        //1 window.formModel.form.rand_code = that.form.rand_code;
                        //2 ms.http.post("/mdiy/form/data/save.do", window.formModel.form).then(function (res) {
                        ms.http.post("/mdiy/form/data/save.do", that.form).then(function (res) {
                            if (res.result) {
                                that.$notify({
                                    title: '成功',
                                    type: 'success',
                                    message: '感谢您的参与!'
                                });
                                //3 window.formModel.form = {}
                                that.form.rand_code = "";
                                that.$refs.form.resetFields(); //清空表单
                            } else {
                                that.$notify({
                                    title: '失败',
                                    message: res.msg,
                                    type: 'warning'
                                });
                            }
                            that.code();
                        })
                    }
                })

            }
        }
    })
</script>
Tip
modelName(业务名称)必须代码生成器的名称一致,否则保存不成功- 表单项字段名称使用驼峰命名写法
- 前台可以通过调用接口获取留言数据,具体查看swagger接口中前端-自定义模块接口
前台获取自定义业务表单数据
//modelName 自定义业务表单名称
//pageNo 当前页
//pageSize 每页显示数量
ms.http.get("/mdiy/form/data/list.do",{modelName:"自定义业务表单名称",pageNo:1,pageSize:30}).then   (function (data){
  if (res.result) {
    res.data.rows //记录数
    res.data.total //总数
  }
})
使用组件 并自定义表单提交查看接口
    <!--    模型部分         -->
    <ms-mdiy-form  ref="modelForm" :type="modelUrl" :model-id="modelId" :model-name="modelName" :id="form.id"></ms-mdiy-form>

    <script>
        var form = new _Vue({
            el: '#form',
            data: function(){
                return{
                    modelName: "自定义业务表单名称",
                    modelId: "自定义业务表单id",
                    modelUrl:{
                        // 模型数据查看
                        get: {
                            "url": "/people/cms/content/model/data.do",
                            "params": {}
                        },
                        save: {
                            "url": "/people/cms/content/model/save.do",
                            "params": {}
                        },
                        update: {
                            "url": "/people/cms/content/model/update.do",
                            "params": {}
                        },
                        // 模型获取
                        modelUrl: "/people/cms/content/model/get.do",
                    },
                    form:{}
                }
            },
            methods: {
                save: function () {
                    var that = this;

                    var formModel = that.$refs.modelForm.getForm();

                    //验证表单是否完整
                    that.$refs.form.validate(function (valid) {
                        if (valid) {
                            //调用自定义模型的保存
                            formModel.save(function (res) {
                                if (res.result) {
                                    that.$notify({
                                        title: '成功',
                                        type: 'success',
                                        message: '提交成功!'
                                    });
                                    // 清空表单
                                    formModel.form = {};
                                    that.$refs.form.resetFields();
                                } else {
                                    that.$notify({
                                        title: '失败',
                                        message: res.msg,
                                        type: 'warning'
                                    });
                                }
                            });
                        }
                    });
                },
            },
            created: function () {}
        });
    </script>
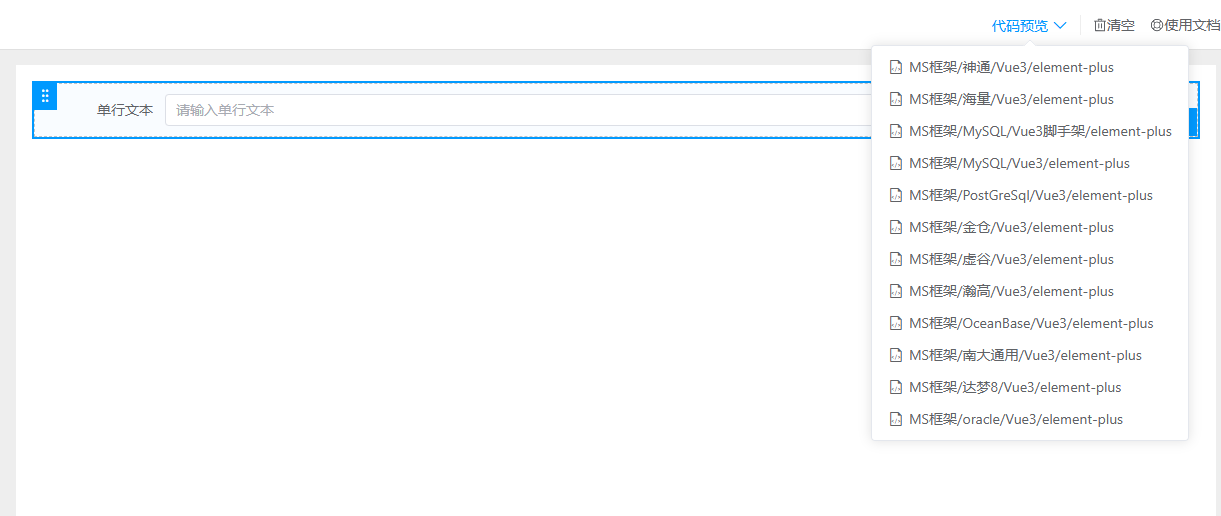
国产等数据库导入模型
代码生成器已推出主流数据库的模板使用,在代码生成器的升级服务即可查看
代码预览选择需要的数据库模板