消息发送
用于重要信息变更验证。支持通过邮件、短信方式进行消息推送,也支持第三方平台sendcloud
SendUtil工具类(推荐)
关键类:net.mingsoft.msend.util.SendUtil.java
关键方法:SendUtil.send(...)
Tip
configType就是自定义配置的名字
public class SendUtil {

    private static final Logger LOG = LoggerFactory.getLogger(SendUtil.class);

    /**
     * 发送邮件
     * @param configType      邮件配置的类型 默认:邮件配置|短信配置|sendCloud短信配置|sendCloud邮件配置(configType就是自定义配置的名字)
     * @param receive          接收用户
     * @param code            模板编码
     * @param values        根据values.key值替换替换模版里面内容的${key},
     * @return
     */
    public static boolean send(String configType,String code, String receive, Map values)  {
        //获取配置信息
        Map<String, String> config = ConfigUtil.getMap(configType);
        if (config == null) {
            throw new BusinessException(String.format("%s不存在", configType));
        }
        if (StringUtils.isBlank(config.get("class"))) {
            throw new BusinessException(String.format("{没有配置监听类 calss"));
        }
        ITemplateBiz templateBiz = SpringUtil.getBean(ITemplateBiz.class);
        TemplateEntity template = new TemplateEntity();
        template.setTemplateCode(code);
        template = (TemplateEntity) templateBiz.getEntity(template);
        if(template==null) {
            throw new BusinessException("邮件模板未找到");
        }
        if(StringUtils.isBlank(receive)) {
            throw new BusinessException("接收人不能为空");
        }
        String[] toUser = receive.split(",");
        BaseSendService sendService = (BaseSendService)SpringUtil.getBean(String.valueOf(config.get("class")));
        return sendService.send(config,toUser,template,values);
    }


}
Tip
实际业务开发推荐SendUtil方式调用,必须严谨、安全
configType就是自定义配置的名字
邮件发送(范例)
//将一下代码片段复制到业务代码中,根据实际的模板参数进行修改,直接调用即可
Map params = new HashMap();

//会根据code的值填充邮箱模版或者短信模版的${code} 收件人收到内容就是 “验证码8888”
params.put("code",8888);

// 调用SendUtil.send发送消息,sendType使用HTML格式
boolean status = SendUtil.send("邮件配置","bindPhone","123@163.com",params);

if(status){
//发送成功
}else{
//发送失败
}
- 邮件发送实体
//将一下代码片段复制到业务代码中,根据实际的模板参数进行修改,直接调用即可
Map params=new HashMap();

// 把实体类转Map,不需要的字段可以过滤掉
params=BeanUtil.beanToMap(entity,params,CopyOptions.create().setIgnoreProperties("createDate",
"del",
"updateDate"));

// 还需要其他参数,和下方一样put
//会根据code的值填充邮箱模版或者短信模版的${code} 收件人收到内容就是 “验证码8888”
params.put("code",8888);

// 调用SendUtil.send发送消息,sendType使用HTML格式
boolean status = SendUtil.send("邮件配置","bindPhone","123@163.com",params);

if(status){
//发送成功
}else{
//发送失败
}
Tip
非字符串类型会转换失败,不需要可以过滤掉,如果必要参数就先转成字符串类型
短信发送(范例)
//将一下代码片段复制到业务代码中,根据实际的模板参数进行修改,直接调用即可
Map params = new HashMap();

//会根据code的值填充邮箱模版或者短信模版的${code} 收件人收到内容就是 “验证码8888”
params.put("code",8888);

//调用SendUtil.send发送消息,sendType使用HTML格式
boolean status = SendUtil.send("短信配置","bindPhone","1888888888",params);
if(status){
//发送成功
}else
//发送失败
}
sendCloud发送短信(范例_推荐)
sendCloud配置
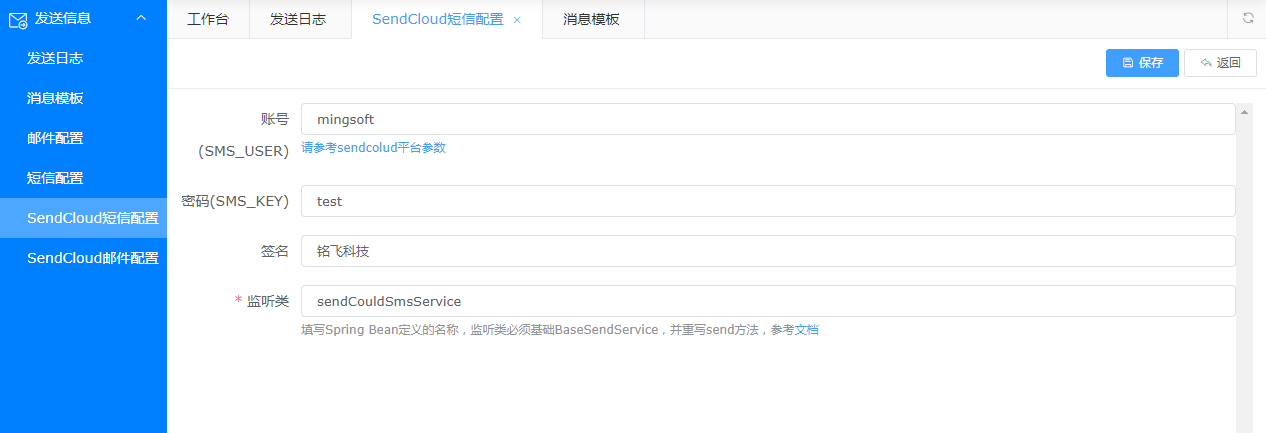
签名指短信签名,如[xxx科技]...短信内容
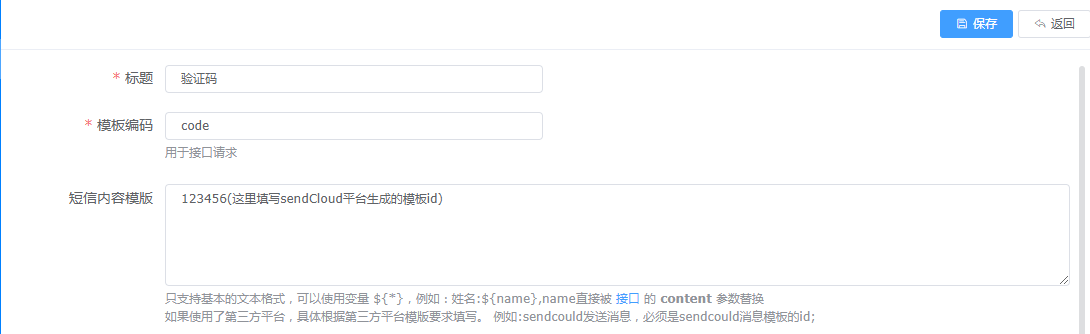
消息模板配置
发送代码示例
...
<el-form-item label="联系电话" prop="phone">
    <el-input
            v-model="form.phone"
            :disabled="false"
            :readonly="false"
            maxlength="11"
            :style="{width:  '100%'}"
            :clearable="true"
            placeholder="请输入手机号">
    </el-input>
</el-form-item>
<el-form-item  label="验证码" prop="randCode">
    <el-row
          :gutter=0
          justify="start" align="top">
    <el-col :span="14">
        <el-input
              v-model="form.randCode"
              :disabled="false"
              :readonly="false"
              :clearable="true"
              placeholder="请输入验证码">
        </el-input>
    </el-col>
    <el-col :span=10>
      <div style="display: flex; height: 38px;">
        <img :src="verifyCode" class="code-img" @click="code" style="cursor: pointer"
             alt="点击换一张"/>
        <div @click="code">
        </div>
      </div>
    </el-col>
    </el-row>
</el-form-item>
<el-form-item  label="短信验证码" prop="phoneCode">
  <el-row
          :gutter=0
          justify="start" align="top">
    <el-col :span=13>
      <el-input
              v-model="form.phoneCode"
              :disabled="false"
              :readonly="false"
              :clearable="true"
              placeholder="请输入验证码">
      </el-input>
    </el-col>
    <el-col :span=11>
      <el-button type="info" plain @click="getCode()">
      </el-button>
    </el-col>
  </el-row>
</el-form-item>
...
getCode:function (){
    ...
    ms.http.post(ms.base + '/sendCode.do',{
        receive: 接收手机号,
        modelCode:"code",
        configType:"sendCloud短信配置",
        rand_code: randCode
    }).then(function (data) {
        if (data.result) {
            that.$notify({
                title: '成功',
                message: '验证码已发出,请注意查收!',
                type: 'success'
            });
        }
    })
    ...
}
扩展发送
可以灵活扩展第三方发送接口,开发者可以快速的扩展发送接口,
扩展步骤
1、代码生成器 设计好发送表单,表单里面必须包含 class 字典
2、通过自定义配置导入
3、创建一个类继承 net.mingsoft.msend.service.BaseSendService 基础类
4、实现send方法
5、通过 SendUtil.send方法调用扩展的接口
扩展发送(范例)
import net.mingsoft.basic.util.SpringUtil;
import net.mingsoft.msend.biz.ILogBiz;
import net.mingsoft.msend.entity.LogEntity;
import net.mingsoft.msend.entity.TemplateEntity;
import net.mingsoft.msend.util.MailUtil;
import org.springframework.stereotype.Service;

import java.util.Date;
import java.util.Map;

@Service("mailSendService")
public class MailSendService extends BaseSendService { //继承 BaseSendService

  /**
     * 发送
     *
     * @param config 配置的类型
     * @param toUser     接收用户
     * @param template   模板内容
     * @param values     根据values.key值替换替换模版里面内容的${key},
     * @return
     */
    @Override
    public boolean send(Map<String,String> config, String[] toUser, TemplateEntity template, Map values) {
        String mailContent = this.rendering(values, template.getTemplateMail());


        //发送
        MailUtil.sendHtml(config.get("mailServer"),
                Integer.parseInt(String.valueOf(config.get("mailPort"))),
                config.get("mailName"),
                config.get("mailPassword"),
                config.get("mailFormName"),
                template.getTemplateTitle(), mailContent, toUser);

        //写入日志
        ILogBiz logBiz = SpringUtil.getBean(ILogBiz.class);
        LogEntity log = new LogEntity();
        for (int i = 0; i < toUser.length; i++) {
            log.setLogType(MAIL);
            log.setLogDatetime(new Date());
            log.setLogContent("mail类型");
            log.setLogReceive(toUser[i]);
            logBiz.saveEntity(log);
        }
        return true;
    }
}
Tip
通过 自定义配置 工具类获取对应的配置参数
web接口
ResponseEntity<JSONObject> content = RestTemplateUtil.post(this.getUrl(request) + "/msend/send.do",RestTemplateUtil.getHeaders(request),requestBody,JSONObject.class);